Getting eyelet curtains to hang well is all about preparation. Before you pick up a drill, think about the weight of your curtains, the size of the eyelets, how you want to fix the fitting, and how the curtains will be used every day. Lighter curtains work fine on café rods or tension rods. Heavier fabrics need something more solid, like a chunky wooden or metal pole. And if you have been asking yourself whether you can put eyelet curtains on a track instead of a pole, the good news is yes, you can. With the right eyelet gliders or clip-on track hooks, a track rail works really well, especially for bay windows or anywhere a neat, hidden fitting suits the room better. It is also worth thinking about what you need the curtains to do. If they are mostly decorative and stay in one spot, almost any fixing will work. If you open and close them every day, a properly fitted track or pole that extends past the window on both sides will make a real difference.
Step 1: Choose the Perfect Pole or Track Rail
Pick a pole or track that suits your curtains and fits the feel of the room. If you are going down the track route and wondering how to use eyelet curtains on a track, look for a track system that works with eyelet gliders. The gliders thread through the eyelet holes and run along the track, so you still get that lovely ripple pleat look without needing a pole at all.
Step 2: Measure for Eyelet Curtains
Good measuring saves a lot of hassle later. Whether you are fitting a pole or working out how to hang eyelet curtains on a track rail, keep these three things in mind
Step 3: Mark Bracket Placement
Before drilling anything, grab a spirit level and mark out where your brackets will go. Position them around 10 to 20 cm above the window frame. This gives the curtains room to hang without blocking light and also makes the window look taller, which is always a nice bonus. Mark everything in pencil first so you can adjust if needed.
Step 4: Drill with Caution
Run a cable and pipe detector over the wall before you start drilling. It only takes a minute and it can save you from a serious problem. Drill at the right setting for your wall type. Masonry walls need a hammer drill mode. Go slowly and let the drill do the work.
Step 5: Secure with Anchors
Once you have your holes, push in wall anchors or raw plugs before you screw anything in. This is especially important if your curtains are on the heavier side. For stud walls, try to hit the stud directly rather than relying on the plasterboard alone. It makes for a much more secure and long-lasting fix.
Step 6: Attach the Brackets
Screw the brackets into place and use your spirit level again to check they are sitting perfectly flat and parallel. The brackets need to take the full weight of the curtains, so do not rush this step. For longer poles or tracks, fitting a centre support bracket is a smart idea to stop any sagging in the middle over time.
Step 7: Thread and Hang the Curtain
This is the step where it all comes together, and it works slightly differently depending on what you are fitting:
On a pole: Slide the pole through each eyelet ring one by one, flipping the direction of each ring as you go. This is what creates that neat wave effect. Once all the eyelets are on, rest the pole in the brackets and clip the finials onto each end.
On a track rail: Thread an eyelet glider or clip-on hook through each individual eyelet, then load all the gliders onto the track before clipping the end stops on. This is how to hang eyelet curtains on a track rail properly, and once you have done it, the curtains will run back and forth just as smoothly as they would on a pole.
Step 8: Tie Back the Curtains
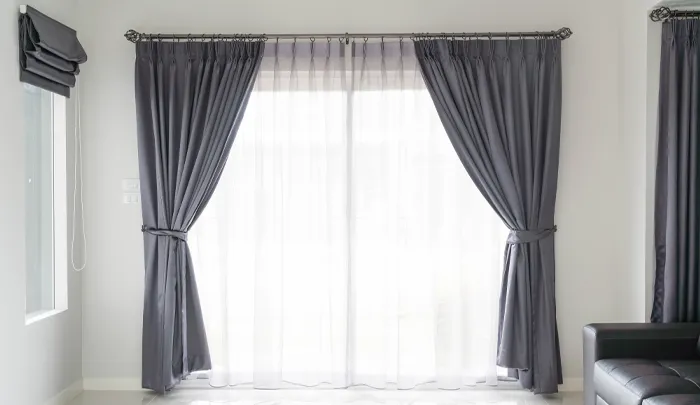
Eyelet curtains are quite good at staying put on their own when you push them to the side, thanks to the weight of the heading. But if you want to add a finishing touch, tie-backs look great and keep things looking neat during the day. Fix the tie-back hooks about a third of the way up from the windowsill. At that height, the curtains fan out nicely, and the window stays clear of fabric.
Finding the perfect window look in Doha shouldn't be a headache. Since 2012, we've been helping homeowners across Qatar ditch standard, ill-fitting sizes for beautiful, made-to-measure window treatments. Whether you need heavy-duty tracks that glide like silk, custom floor-to-ceiling curtains, or smart motorized options for your villa, our local team handles everything from the first precise measurement to the final expert installation.
Enhance your space with our curated range of curtains. Explore the options available.
Yes, you can. Eyelet curtains are usually made for poles, but they work perfectly well on a track rail too. You just need the right eyelet gliders or clip-on track hooks. Thread them through the eyelet holes, load them onto the track, and the curtains will run smoothly and look just as good as they would on a pole.
Absolutely. A lot of people prefer tracks for bay windows or rooms where they do not want a visible pole. As long as the track is strong enough for the weight of your curtains and you use the right eyelet gliders, it works really well.
Around 10 to 20 cm above the window frame is the sweet spot. It makes the window look taller, lets more light in when the curtains are open, and gives floor-length curtains a really clean, elegant drop.
Most eyelet curtains have an inner eyelet diameter of around 40 mm, which suits poles between 25 mm and 35 mm. Always check the eyelet size against the pole before buying. The pole should be noticeably smaller than the eyelet opening so the curtains slide easily without catching.
Thread an eyelet glider or clip-on hook through each eyelet ring. Once all the gliders are on, slide them onto the track and fit the end stops. Put the track up around 10 to 20 cm above the window frame and make sure it sticks out far enough on both sides that the curtains can pull right back off the glass.
Around 30% wider than the window opening is a good rule of thumb. That way the curtains can pull back fully without any glass being covered. The curtains themselves should be about 50% wider than the pole or track so they hang with enough body and do not look thin or gappy.
Not on a pole as the pole simply threads through the eyelet holes. On a track rail though, you will need eyelet gliders or clip-on track hooks to link the eyelet rings to the track so they can run along it properly.
© 2026 - Aspire Furniture All rights reserved. Powered By SilverHost